Wednesday, July 28, 2010

The $175.00 er ... $234.00 Workbench

I'm a bit of a gamer. Not that I have the time to game really. Between family/friends, work, woodworking and blogging (not necessarily in that order), there's little time left. When time permits, I play Lord of the Rings Online (or AKA LOTRO) and my 'toon' (or avatar/character) is an Elven Hunter. One of the things beyond adventuring that keeps the game interesting is the ability to engage in crafts of the period. My toon is -of course- a Woodworker by trade. One of the stipulations of engaging in this craft is that it must be performed at a workbench. Sometimes my toon has to travel a great many miles to get to one. I guess there were no plans for portable benches in Middle Earth.

The benches in the crafting halls of LOTRO are massive but simplistic.

My bench on the other hand is simplistic and light. While trying to dimension a small piece of Ash, the whole table rocks back and forth, the top slides around unless clamped to the sawhorses and the dog holes are oblong from he type of abuse which plywood is not designed to take without support.

It's time for a new bench. While I can't afford to make it from maple or even poplar, I found an article on Popular Woodworking's (link) site written by the Schwarz himself on building a workbench from construction grade lumber, 8 bolts, a vice and some dogs for 175 samolians.

The lumber list calls for 8 pieces of 2"x8"x12'. So, off to the orange Borg cube I went. It's less than 1/2 km away - way too convenient for a store that drives me nuts. They didn't have any lumber in 12'. There's 8', 10', and 16'. I decided to go with the 8 footers. Of theses, they only had about 20 pieces and only 12 of them were acceptable and needing 16 of them meant multiple trips.

They also didn't have any 3/8" #16 bolts in the 6" length. This required a trip to the local Brofasco.

2 days later, I had all of the material piled in the garage. I only have to wait for the moisture content to equalize and pray that any warp is limited. I think it will be okay. It isn't Southern Yellow Pine as is called for, but the local equivalent labeled as SPF (meaning spruce/pine/fir).

 My acquisitions included a trip to the Lee Valley store (AKA woodworkers Mecca) to pick up a bench vise, a Wonder Dog and a pair o bench dogs. All totaled, the cost breaks down as:
Lumber $93.28
Bolts/washers/nuts $15.00
Large Front vise $75.00
Wonder Dog $37.50
Bench pups $23.50
Total cost (before tax) $234.28

Okay, so it's not $175.00 . The article was written on Feb 2, 2007 and I'm working with 8' lumber instead of 12', so I need twice as many. This also gives me the opportunity to potentially play with the design a bit and maybe use legs on angles (like a roof truss) instead of square. It's a thought that I'll have to play about in Sketchup with before I make my decision.

While I think about it, Middle Earth needs defending and my woodworking hunter needs more practise with his chisels.


Tuesday, July 27, 2010

Anticlimactic Endings, Anticipation of New Beginnings

Colds in the summer time really bite. It's been almost 2 weeks that I've had this malady. I think I got it when we went to a party for the daughter of my wife's cousin held at a children's party places. The type where there's all sorts of things for kids aged 2-10. Bouncy castles, rocking horses and pizza for all. Plus all those grubby little hands from all sorts of kids with their advanced immune systems that carry viruses that the average adult with 1 child or less are ill-equipped to combat.

For about a week, I found myself tiring quickly and on medication that will mask the symptoms. I think really that the virus just goes into hiding, resting until the medication wears off to renew its onslaught. I've felt better, but I've felt far worse as well.

I've felt good enough now over the last week (with just a lingering cough and humidity/smog triggered asthma) to resume my work on the cabinet. While I was sick and refusing to mix medication with power tools, I put the time to good use and first did some research on options. I discovered that centre mount drawer slides were the least amount of work and would not compromise quality.


Having learned some from my experiences, I decided to query the good people that hang out on Lumberjocks as to the best way to mount them. Lumberjocks really is a great community and it didn't take long to get the information I needed. A single board running up the centre of the cabinet with some support rails mortised into it running from the back to the front in which to mount the fixed part of the slide.

Today I finished the cabinet by adding the drawer hardware. While I feel relief that the first project conceived in the shop is done, I know that there will be modifications needed. A door perhaps over the hangers section; and, doors over the shelves. Maybe add pull out boxesor the bottom cubbies? It's really a bit of a let down to know that a project you want to consider done is not really quite done.


For now there's other priorities. Like building my workbench. Anticipation once again is rising!

Tuesday, July 6, 2010

It Ain't Half Hot Mum!

I've never actually seen the show or maybe I have and I was just too young to really understand it. Maybe I confused it with MASH. Maybe the heat is just getting to me.

Our area has had it pretty good over the past several years. Until now. In fact, we're in the middle of our first heat wave in 3 years. I actually don't remember it getting this hot since the summer of 2005 when I met the wonderful woman who would become my wife, and I mean that Literally (this is a PG blog after all). It's been 35 C and with the humidex, feeling into the mid 40's. You almost need a knife and fork to help with digesting the air before you breathe it.

It's nice to have the sunny weather as last year it seemed like April most of the summer - raining mostly on weekends. This is a bit of an extreme however and a fellow woodworker in Texas called me a Canadian lightweight. Well, if I'm a lightweight, so be it. With Scandinavian origins and being accustomed to the average temperature being less than 30 C, this heat wave is driving me out of my shop and into the comfort of my air conditioned home. I tried to do some hand planing tonight, but within 2 minutes, I was dripping all over the work piece. No pics, sorry. Don't want to gross anyone out.

I'm totally jealous of any of you with A/C in your shops or if you have your shop in the basement

This weather's not supposed to break until the weekend. It won't be cool, but it will be a little more seasonable.

Stay cool my friends.

Monday, July 5, 2010

Lesson Learned - Proper Planning

Geez, I was cheesed off today. After about a week of forced inactivity due to the tendinitis, having what I thought was an incredible day, I came across a factor that I didn't plan for in the Nursery cabinet. Note, piss poor planning can be the same or worse than not planning at all. Hear my continuing saga where if I had planned properly, I would have this project completed.

The day started with sleeping in until 9. When you have a three and a half month old baby, sleeping in, no matter how late is a wonderful luxury. After some breakfast and about an hour of playing around on the computer, I thought it was late enough on a Sunday morning to begin running power tools without rousing the neighbourhood into tarring and feathering me. It was already 27 degrees Celsius with a forecast high of 34 before the humidex. So I opened up the the main door and the back door to the garage to allow a breeze to flow through. Luckily there was one. I prefer not to drip sweat onto my project.

A week ago, I blogged a bit about the frames of the drawers being completed. They've sat in the shop all week waiting for the bottoms to be made. I decided upon solid bottoms as I thought it would be good practise. The first panel had been glued up yesterday. Gluing up 3 boards of 1/2" white pine was not a taxing task and I was hoping that the shoulder would be able to indulge me today.

The idea was to create a beveled edge drawer bottom I scribed a line across the face to where I would cut one side and I used my Japanese pull saw to make the first cut (I've really fallen in love with the pull type saws and look forward to getting one for joinery). I mostly managed to stay on line, but a few swipes from my bevel up plane took out the visible hills where I wandered. With 2 edges now at right angles to each other, I was able to make the other 2 cuts on the table saw to get it to size.

Marking the lines on the bottom, and the edges, I proceeded to use my smoothing plane to get the bevels to proper size. I found it important to sneak up on the fit and go back a couple of times and take a few more swipes with my plane before it slid neatly into place. I stepped back to admire my handiwork.

It was perfect .... or so I thought.

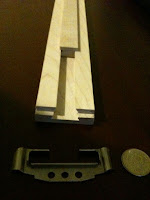
That's right, you see a typical lightweight drawer slide that I was planning on using sitting along the edge where it should be getting installed. This particular drawer slide calls for #8 screws to hold them to the drawer body. If the head were to get any smaller, it would slip through the mounting holes. Problem is that the groove for the drawer bottom is only 1/4-1/2" off the bottom of the frame. Screwing the rail to the drawer would cause it to drive into the drawer bottom which would cause the bottom to be locked in and not allow for wood movement. With the changes in humidity between winter and summer, there could be as much as 1/4" of movement which would be very bad.

One solution for this would be to use different hardware. My options turned out to be very limited due to the size of my cabinet. At 15" inner depth, I would have to either stick with what I've got or go overkill and use heavy duty hardware. For something that is designed to hold clothing, I didn't want to pay $20 per drawer for slides. So I came up with another solution that I thought would fit the bill. Adding a strip to the outside to allow the drawers to have their hardware mounted without endangering the bottom. I even had plenty of 1/2" scraps. I was thinking, "Cut to size, add a profile to make it look nice and glue to the drawer side. Et voila!"

All was once again right ... Guess again!

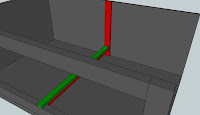
I guess I was a bit hasty in determining the needed dimensions for the drawer. Here's part deux of my piss poor planning. My drawer opening on the inside of the face frame for the drawers is 22 1/8".

...

Argh! The drawer slides require a 1/2" on either side! My drawers are 22". I fail again.

After kicking myself in the rear a few times (metaphorically, I don't bend that well any more), I did a search for various drawer slide options on how I might overcome this issue. Bottom mount drawer slides seemed the best bet, but most of what would work for me was looking to be in the $35 + range. A non-option in my opinion.

I am determined to not simply turn my work into waste by trashing my drawers and making new ones. That leaves me with one last viable option. Web frames. This is going to be fun (read NOT) as the cabinet itself is already built and in place. The picture to the left is the space I'll have to work within. At least the cross rails can be removed as they are only fastened in with pocket screws.

At least I'm laughing at myself. I'm also learning that cabinets are a lot more than slapping a few pieces of plywood together and making pretty drawer fronts. God help me when I decide to tackle building a chair! I'm no longer cheesed with myself as I have to look at this as a learning experience.

I guess what I'm trying to say is, if you are ever planning on building a cabinet, make sure you plan for everything. You are including doors? Pick your hinges. You're including drawers? Find out what hardware you want to use and make sure it will fit into your plan. I started this as my first project in January and I'm having to make adjustments along the way because I didn't plan properly.

(Queue announcer) Tune in next time to see what else the Novice Wood Rambler failed to plan for. Will our intrepid hero put the drawer faces on backwards? Will he notice? Will he get his web frame in?

P.S. Happy 4th of July to all my friends in the U.S.